Date: 07 February 2024
Revision: 1.1.0
Copyright Esprida Corporation 2024 | All rights reserved
For optimum product performance, please make sure you read this manual and thoroughly understand the contents before installing, using, or maintaining your ConnectedCrops™ Station and CCMobile App™.
You can also refer to FAQ, and helpful articles. And for technical assistance, please contact us at: support@connectedcrops.ca
- APPLICABILITY
- 1: SUMMARY
- 1: Getting Started
- 3: the CCMobile App Screens
- 4: Troubleshooting
- 4.1 LED Lights Guide
- 4.2 Troubleshooting Scenarios
- 4.2.1: Station lights are not illuminating during startup
- 4.2.2: Not getting readings on the CCMobile App
- 4.2.3: Sensors are connected but show as though they are not
- 4.2.4: Soil Sensor “Please install sensor in soil” reading
- 4.2.5: Sensor “Error” reading
- 4.2.6: “Sensor setup mismatch” reading
- 4.2.7: Station registration error: Station already exists
- 4.2.8: Signed up but never got a confirmation email
- 4.2.9: Can’t log in to the CCMobile App
- 4.2.10: Station shows offline on CCMobile App although Cellular Connection lights are illuminating
- 4.2.11: Station doesn’t seem to be charging
- 4.2.12: Not Receiving email or SMS text messages when sensor thresholds are exceeded
- 5: Contact Us
APPLICABILITY
This CCMobile App user Manual applies to version 5.2.0 of the CCMobile App available on the Google Play Store or the Apple App Store.
The version of CCMobile App installed on your phone can be found:
- on the bottom of the CCMobile App login screen; or
- on the Settings > About screen
1: SUMMARY
1.1 Summary
The ConnectedCrops system is a powerful tool that provides real-time temperature and/or soil moisture data in agricultural fields on a user’s mobile phone. This real-time data, in addition to email and text message alerts, allows agricultural professionals to make key decisions for irrigation, frost protection, and spraying without having to be in the field, or even in the country. Users can receive monthly reports to see data changes for a station over the month and can receive historical data to allow comparisons and look for trends from field to field, month to month, or year over year.
CCMobile App (“the App”) is a mobile application for ConnectedCrops Agriculture Stations (“Stations”). The App enables ConnectedCrops owners/users to:
- view sensors’ readings of the crops on their farm(s),
- control the ConnectedCrops station’s operation,
- setup email and/or SMS text messaging alerts based on sensor readings,
- view or download historical sensor data, and
- receive monthly sensor data in PDF chart and Microsoft Excel formats.
CCMobile was built and designed using growers’ requirements and feedback to ensure it satisfied their needs for a reliable tool – a tool that told them the temperature and soil moisture condition of their farm, anytime and anywhere in the world, in real-time. No need for data extraction and no need to be physically close to the Stations.
This CCMobile App User Manual describes the features available in the App, how to troubleshoot conditions that can occur, and how to contact ConnectedCrops support staff for additional support.
1: Getting Started
2.1: Download and install the CCMobile App
If you are reading this manual on your phone, you can click on one of the icons below to navigate directly to where you can download the app:


for Android phones OR


for iPhones.
Or, from your smartphone, go to Google Play or the App Store and:
- search for connectedcrops (one word), ccmobile or Esprida
- click on the application icon with the description ConnectedCrops – CCMobile
- click on the Install button
- Once installed, click on the Open button to launch the CCMobile App
2.2: Sign Up
To log in to CCMobile to activate station(s) and check their readings, you need to first set up your account. To create a ConnectedCrops account:


- launch the Application
- click on Sign Up Now
- fill in your farm name and the remaining fields. Note: All fields are mandatory
- view the Licence Agreement
- click on the Sign Up button
| Note: CCMobile passwords must conform to the following specifications: · a minimum length of 8 characters · must contain at least one (1) number · must contain at least one (1) lowercase letter · must contain at least one (1) upper-case letter · must contain at least one (1) special character from the list of @, $, @, !, %, *, ?, and & |
Once you press sign up, you should see an ALERT confirmation message on your screen and an email will be sent to you with the confirmation/activation link.
- click on the OK button in the successful signup ALERT screen


- you will be directed back to the Sign in screen
- on the same phone, open the email you received from ConnectedCrops and click on the link to verify your account


NOTE: if you don’t see the email, please check your Spam or Junk folder.
- clicking on the link will re-launch the CCMobile application and log you in if you are using the same phone on which you signed up. If not, provide the email address and password credentials you just created and click on the Sign in button
- the first time you log in, CCMobile will provide some help pages to give you a quick overview of its features. We recommend you read them
- if you encounter an alert message indicating the account is not active, email support@connnectedcrops.ca and provide the email address you are trying to setup and our support team will manually activate your account


3: the CCMobile App Screens
The CCMobile App has 3 main screens from which you can access all of the information and data you need and configure your station(s):
- the Home screen
- the Events screen
- the Settings screen


Most of the screens you will encounter will have these 3 buttons available on the bottom. If you don’t see, these 3 buttons on the bottom of the screen, there will be a back arrow that will allow you to return to the previous screen.
This section will describe each of these screens.
3.1: the Home Screen

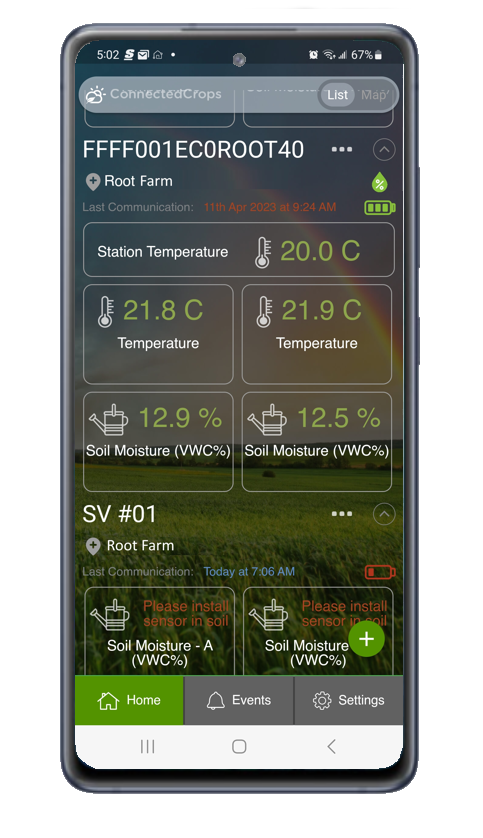
The Home screen displays the sensor readings for each of your ConnectedCrops stations. It is a one-glance view of the current temperatures and/or soil moisture sensors.
The screen orders the stations alphabetically by Station name. if you have multiple farms, sorting will be performed alphabetically, first by Farm and then by Station name.
Users can view their stations in either a List view or a Map view. The view can be toggled using the List / Map slider.
There are two models of the ConnectedCrops stations:
- Gen 4 (Generation 4): can accommodate 2 sensors and has a built-in solar panel on the front of the station
- Model 5: can accommodate 4 sensors, has a separate solar panel unit that is plugged into a port on the bottom of the station, and has a temperature sensor and humidity sensor built into the station enclosure
As a result, the way each of these stations is depicted in the App interface is slightly different.
Generation 4 stations will be depicted according to the image below:


The Model 5 stations are depicted according to the image below:


3.1.1 Last Communication time
The Last Communication field indicates the last time the station transmitted any data to the ConnectedCrops Cloud.


If the reported time is in blue, the last communication was within the last 24 hours.
If the reported time is in red, the last communication was more than 24 hours ago.
3.1.2 Battery Level
Battery level readings can be in green, yellow, red, and gray depending on its status.
- if the battery level is between 40% and 100%, the battery icon will be green
- if the battery level is between 21% and 39%, the battery icon will be yellow
- if the battery level falls below 21% of full charge, the battery icon will be red
- if the battery level is outside of the range of 0% and 100%, or an internal error signal is received, the battery icon will be gray
3.1.3 Soil Moisture sensor readings
Soil Moisture sensor readings can be in green, yellow, or red depending on their status. The status is measured based on the thresholds you define. If not defined, CCMobile will use default values based on the soil type defined for this sensor.
The image below depicts an example of a soil moisture sensor with defined thresholds for:
- at or below Wilting Point (sensor readings will appear in red)
- approaching Wilting Point (sensor readings will appear in yellow)
- approaching Field Capacity (sensor readings will appear in yellow)
- at or above Field Capacity (sensor readings will appear in red)
- in the ideal soil moisture range (sensor readings will appear in green)


| Error Message | Reason | Required Action |
|---|---|---|
| Please connect the sensor | The App is not getting readings from the soil moisture sensor. Either it’s not properly connected or physically damaged | Try to connect the sensor as described in the manual and check for possible physical damage |
| Sensor setup mismatch | The sensor type chosen during sensor setup doesn’t match the actual sensor type connected to the Station | Either physically change the connection as needed or correct the setup under Station Configuration in the CCMobile App |
| Please install sensor in soil | Indicates that the sensor is connected but the readings coming from the sensor indicate it is not inserted in soil. | If it is installed in soil, check for air gaps around the installed sensor. |
| Error | Reading is out of range | Check the sensor connection and physical condition. If it doesn’t change, the sensor may be damaged/defective. Contact support |
3.1.4 Temperature sensor readings
Temperature sensor readings can be in green, yellow, or red depending on their status. The status is measured based on the thresholds you define. If not defined, CCMobile will use default values based on the soil type defined for this sensor.
The image below depicts an example of a soil moisture sensor with defined thresholds for:
- at or below Low Temperature threshold (sensor readings will appear in red)
- less than 3 degrees above the Low Temperature threshold (sensor readings will appear in yellow)
- less than 3 degrees below the High Temperature threshold (sensor readings will appear in yellow)
- at or above the High Temperature threshold (sensor readings will appear in red)
- in the ideal temperature range (sensor readings will appear in green)

In some scenarios, you may also see error messages in place of a temperature reading:
| Please connect the sensor | The App is not getting readings from the temperature. Either it’s not properly connected or physically damaged | Try to connect the sensor as described in the manual and check for possible physical damage |
| Sensor setup mismatch | The sensor type chosen during sensor setup doesn’t match the actual sensor type connected to the Station | Either physically change the connection as needed or correct the setup under Station Configuration in the CCMobile App |
| Error | Reading is out of range | Check the sensor connection and physical condition. If it doesn’t change, the sensor may be damaged/defective. Contact support |
3.1.5 Email Excel reading report
To download sensor readings from a Station:
- click on the Station Menu icon
- choose the “Email Excel Report”
- fill in the email address(es) to which you want to send the report


3.1.6 Humidity Sensor reading (Model 5 only)
The Humidity Sensor on the Model 5 stations is used to detect high humidity levels within the station enclosure, indicating a potential water penetration issue. Humidity sensor readings can be in green, yellow, or red depending on the status.
- humidity below 50% (humidity sensor icon will be green)
- humidity level between 51% and 65% (humidity sensor icon will be yellow)
- humidity level above 65% (humidity sensor icon will be red)
- humidity sensor reading outside of the sensor’s normal operating range (humidity sensor icon will be red)
As a user, you will not receive notifications if the humidity sensor goes into the yellow or, red; however, ConnectedCrops support staff will be warned of such situations and will reach out to you directly to assess the situation.
The humidity sensor threshold values are not configurable by the end user through the CCMobile App.
3.1.7 Onboard Temperature Sensor reading (Model 5 only)
The Onboard Temperature Sensor on the Model 5 stations is used to determine the temperature directly at the station. While this sensor is internal to the ConnectedCrops enclosure, the low heat output by the ConnectedCrops station components and the sleep state when the station is not transmitting data means this temperature should reflect the actual temperature of the outside conditions without any effects from wind, rain or snow.
The Onboard Temperature Sensor readings can be in green, yellow, or red depending on its status. The status is measured based on the thresholds you define. If not defined, CCMobile will use default values based on the soil type defined for this sensor.
3.2: The Events Screen
The Events screen displays a list of events that have been generated for the station you have access to. An “event” is like a news feed of updates related to your Station’s performance or readings meeting thresholds. If Alert Notifications have been enabled, you will have received an email or SMS message for each of these events.
Pressing the down arrow beside an event will provide more in-depth information including the threshold that triggered the event.


3.3: The Settings screen
The Settings screen allows the user to make changes to the stations or CCMobile App. Pressing the Settings button will bring a screen with the following list of activities:
- Configure Station
- Add New Station
- Accounts
- Help
- About
- Logout
3.3.1 Configure Station
Selecting Configure Station will present the user with a list of the station they have access. Choose one of the stations from the list by pressing on the name of the station. Once selected the user will be presented with the screen shown.

3.3.1.1 Rename Station

Selecting Rename Station allows a user to change the name of a station. This might be done if the station is being moved to a different location. Selecting OK will save the station’s new name. Selecting the ← button will return the user to the Station screen.
3.3.1.2 Transmission Frequency
Selecting Transmission Frequency allows a user to change how often a ConnectedCrops station communicates sensor data to the ConnectedCrops Cloud and the CCMobile App.
When setting the Transmission Frequency, consider how quickly the conditions you are monitoring can change. If your station is only monitoring soil moisture, soil moisture changes occur slowly so a less frequent transmission frequency will be acceptable (e.g., every 6 hours). If you are monitoring for temperature changes, these can occur more rapidly and you may want to be alerted to temperature thresholds being reached quickly. This situation might require a more frequent transmission frequency like every 30 minutes.
Be aware that the more frequently data is transmitted, the more battery will be consumed. With bright, sunny days this will not be an issue but, for prolonged periods of cloud or rainy days, the solar panel may not be able to keep the battery charged.

3.3.1.3 Location
Selecting Location allows the ConnectedCrops station to be located on the map view. Selecting Location for the first time will prompt the user to allow the CCMobile app to use the phone’s geolocation service to find the precise location of the station. Allowing this service will simplify the map setup.
If a user declines this service (e.g., Don’t allow) or needs to change the location after initially being set, they can still locate their ConnectedCrops station on the map. To do this, a user can use their finger to move the map until the green station pin is hovering over the correct farm/field location and then select the SAVE button.


| NOTE: A user can use the two-closing-fingers movement to zoom out and make the map resolution smaller. This will result in each single-finger map movement making the green station pin move further geographically. Using the two-expanding-fingers movement to zoom in can then be used to precisely locate the green station pin. NOTE: You can not manually enter the Latitude and Longitude values in their respective fields. |
3.3.1.4 Sensors Setup
Selecting Sensors Setup allows the user to define the type of sensor connected to each port on their ConnectedCrops station. If a port will not have a sensor connected to it, set the radio button for this port to None to avoid having the port show up with an error in the CCMobile App.
You can also provide a meaningful name for the sensor so that when alert notifications arrive, you understand exactly which sensor is reporting the reading. This is especially important if there will be more than one temperature or soil moisture sensor on the same station.
Ensure you press the Save changes button made to a port before proceeding to another port or returning to the previous screen.


3.3.1.5 Receive notifications via …
Selecting Receive notifications via… displays the screen where a user can define how they would like to receive alert notifications.
Email and SMS text Message Alert Configuration
By sliding the Email: and/or SMS: sliders to ON, the user can insert the email address and/or mobile phone number where they would like to receive notifications when a sensor exceeds any of their defined thresholds or when other important station events occur.
You can include additional email addresses or mobile phone numbers by selecting the + Add More button to have a new line displayed.


Blackout Period Configuration
A Blackout Period is a defined period when users will not receive email or SMS text messages, for this station, when sensor thresholds have been exceeded. This feature allows a user to prevent the sounds associated with email and SMS text message arrivals from waking a user up during their sleep or to avoid being disturbed during any other defined period.
Only one (1) Blackout Period can be defined for a station, but each station can have a different Blackout Period.
By sliding the Blackout Period: slider to ON, the Blackout Period popup screen will allow a user to define a start and end time for the blackout period by moving the corresponding endpoints.
Selecting the OK button will save the blackout period.
A Blackout Period can be modified by selecting the button underneath the Blackout Period: heading, adjusting the times, and then selecting the OK button.
To disable a Blackout Period, slide the Blackout Period: slider to the OFF position.
Monthly Reports Configuration
On this screen, a user can also define if, and how often, they would like to receive a monthly report for this station. The monthly report provides a chart showing the sensor readings for the past month in PDF format. It also includes the raw sensor data in Excel® format so users familiar with Excel can perform their own spreadsheet data calculations.
To enable receiving monthly reports, select the Monthly Report: slider to ON and indicate, using the checkboxes, which months you would like to receive the reports for.
| For all changes made on the Receive notifications via… screen, ensure you press the Save button at the bottom of the Receive notifications via… screen before returning to the previous screen. |
3.3.1.6 Thresholds
Selecting Thresholds allows a user to define Alert Notification thresholds for each sensor connected to a station.
Soil Moisture
Soil Moisture thresholds can be set for:
- Field Capacity
- approaching Field Capacity (Soil Moisture (VWC%) is above:)
- approaching Wilting Point (Soil Moisture (VWC%) is below:)
- Wilting Point

These 4 points represent the moisture thresholds at which an alert will be sent via email and/or SMS text message to those people defined in the Receive notifications via….
Soil Moisture characteristics are dependent on the type of soil that is being monitored and the type of crop being grown. When the user selects a soil type the dropdown list, default values for the Field Capacity, Wilting Point, and 2 Approaching thresholds will be populated.
Field Capacity is the amount of soil moisture (or water content) held in the soil after excess water has drained away via gravity and the rate of downward movement has decreased. It is all of the water in the soil it can hold against the pull of gravity. In the field, this usually takes place 2–3 days after a rain or irrigation event. It can also be measured in a laboratory. It is highly dependent on the type of soil, where clay soils can retain a high amount of moisture for a longer period of time while sandy soils retain much less moisture because of the large pores between sand particles. Any rain or irrigation that occurs beyond Field Capacity is lost as the soil is incapable of retaining it.
The soil type chosen on the Thresholds screen will automatically populate a Field Capacity VWC% value. This value comes from laboratory and field research for the different types of soils and ConnectedCrops recommends keeping this default value unless you have performed your own measurements that indicate a different value should be used for your soil.
Wilting Point (or Permanent Wilting Point – PWP) is the point at which there is so little moisture in the soil, and the soil is holding on to this moisture with such force, that the plant’s roots can no longer extract the moisture from the soil. At this point, the plant becomes starved of moisture and nutrients.
While the Wilting Point VWC% value is defined from laboratory experimentation for each soil type based on a common procedure, is clear that there are many other factors that impact, not least of which is the type of crop and the capabilities of its root system to extract moisture. As such, the user may want to adjust the Wilting Point VWC% value if there is more accurate information available from research done for your particular crop and soil type.
Approaching Field Capacity (Soil Moisture (VWC%) is above:) is not a scientific value but rather a recommended warning threshold. If you were irrigating when this alert is received, it means you should consider stopping your irrigation in this field.
Approaching Wilting Point (Soil Moisture (VWC%) is below:) is also not a scientific value but rather a recommended warning threshold. If you receive this alert, it means you should consider starting irrigation in this field unless you are aware of a significant rain event in the very near future.
Temperature
Temperature thresholds can be set for:
- Temperature is above
- Temperature is below
3.3.1.7 Alert Notifications and Weather Forecasts
When sensor thresholds are set in the previous section (3.3.1.6) AND Email alerts and/or SMS text messages have been enabled and configured (section 3.3.1.5 Receive notifications via…), the user will receive email and/or SMS text message alerts when a sensor threshold has been exceeded.
Each message will contain:
- the name of the station
- the name of the sensor
- the date when the message was generated
- the sensor reading
- the values of the relevant thresholds for this sensor
In addition, weather forecast data is provided for this station’s specific geographic location. Email alerts contain 3 days of weather forecast information: Today, Tomorrow, and the day after. SMS Text alerts only contain weather forecast data for today because of text length limitations.
This weather information can be helpful when making decisions to address the root cause of the alert received. For example,
- Will temperatures continue to fall and do I need to take steps to mitigate against frost damage?
- If my soil moisture is low, am I expecting rain in the next 24 to 72 hours?
- Will high winds and high temperatures cause soil moisture to decrease more quickly and should I irrigate sooner than scheduled?
| IMPORTANT: To receive weather forecast information, valid latitude and longitude values must be entered for the station |
3.3.1.8 Add inversion alert
The Add inversion alert screen allows a user to define the temperature sensors and temperature differential that would represent a temperature inversion; when the temperature closer to the ground is colder than the temperature higher from the ground. Understanding when temperature inversions are occurring is an important factor when deciding when to spray crops.
NOTE: The Add inversion alert selection will only be available if your station has at least 2 temperature sensors connected to it.
On this screen, the user will define which temperature sensor is at the higher height, which temperature sensor is at the lower height, and what temperature differential will trigger the alert notification. A temperature differential of +2 °C (as shown in the image below) means the temperature on the highest sensor is 2 degrees warmer than the temperature on the lower sensor.

3.3.2 Add New Station
Selecting Add New Station will walk the user through the steps required to an additional ConnectedCrops station to their farm through the CCMobile App. These steps are identical to the steps followed when the first station was registered.
The label at the back of the ConnectedCrops station provides the following information.


- HW: Hardware version
- FW: Initial Firmware version
- BL: Bootloader version
- Date: Manufacturing date
- Serial: Serial number
- ICCID: SIM Card Identification #
The wizard in the CCMobile App will walk you through the four steps for activating a Station:
- Registration: Registering the station to ConnectedCrops Cloud
- Sensor Setup: Setting up the sensors for each station; defining their types, names, and the ports to which they’re physically connected on the Station.
- Activation: Powering up the station, or resetting it, and checking if CCMobile is receiving readings from the stations
- Configuration: Setting up the alerts, station’s properties, and operation mode
3.3.2.1 Registration
This step registers the station to ConnectedCrops Cloud using a station name of your choosing and its unique serial number:
- press the Scan QR Code button to scan the QR code on the back of the station. You may be presented with a pop-up alert asking you to allow the CCMobile to access your camera app. Please allow this to proceed
- if allowed, the phone’s camera will automatically be launched
- scanning the QR Code label will automatically populate all of the registration fields
- in the Station Name field, enter a name for the station. This name should represent the location where the station will be placed to make it simpler for you if you deploy multiple stations (for example “East Field”)

- if you do not use the QR code or have issues with your camera, you may enter the details of the station manually. To do this, click on the arrow next to Type in the details manually and fill in the fields with the information displayed in the QR Code label
- Click the Register button at the bottom of the screen
- if the registration process is successful, the CCMobile App will display the message Station was registered successfully to the system. Let’s get the readings! Press the OK button and proceed to the next step of the registration process
| NOTE: If you DENY access to your phone’s camera, you must manually type in the registration information from the QR Code label on the back of the station. |
3.3.2.2 Sensor Setup
This step of the registration process will define what types of sensors are connected to the station and to which ports.
- select the Port 1 radio button (or Port A radio button if registering a Generation 4 station) and select the radio button next to the sensor that is connected (or will be) connected to that port
- a default name will be provided for the sensor but you can provide a sensor name that better reflects the sensor use or location (Ex. Soil Moisture at 8”) or (Temp at fruiting zone)
- click Save changes to port 1 button (or Save changes to port A button) to save and move to the next port
- you will receive the popup message Sensor in Port 1 is configured! (or Sensor in Port A is configured!). Press the OK button on the popup
- repeat these steps to set up ports 2 – 4 (or port B if registering a Generation 4 station). If one or more ports on the station will not have sensors attached to them, leave the radio button for these ports set to None


3.3.2.3 Activation
This step of the registration process will activate the station to start the data collection process.

- make sure that you are in an area that has good mobile coverage
- at this time, ensure that the antenna is connected, and the sensors are connected to their correct ports
- connect the fuse if it wasn’t already connected, or press the Reset button on the back of the station if the fuse was already connected
- press the Next button
- a countdown timer will be displayed as the station starts up (if the fuse was just inserted), the communicAccountsink between your station and the ConnectedCrops Cloud is established, sensor readings from the station are sent to the cloud and the mobile app is able to retrieve this information from the cloud
- if you get an error message, check the listed steps to guide you through solving the issue. Then, using your finger, pull the screen down to refresh and try getting the readings again or you can also press ‘Back’ and press ‘Next’ again.
Please check the troubleshooting section if you are facing issues while activating your station.


- ConnectedCrops recommends you test the sensors before installing them in their in-field locations. For example, try to dip the temperature/soil moisture sensors in water and check the readings. Soil moisture should be close to 60% and the temperature will depend on the water being hot or cold
- you can monitor the lights on the Station during the registration process to ensure the Station is working correctly:
- the battery light should illuminate blue during the registration process indicating there is enough battery charge to transmit the data required for the process
- the cellular signal light will transition from flashing on /off blue to continuous blue illumination during the registration process
- the light labeled 1 will illuminate blue during the registration process and then extinguish unless there is an internal hardware failure
- the light labeled 2 will illuminate blue during the registration process. If one or more of the sensor ports have been configured to have a sensor connected to it, but the sensor is not connected, the light will illuminate red.
- NOTE: the logic to determine the colour of the LED 2 light is a combined effort between the ConnectedCrops Cloud server and the Station; therefore, it will take 2 complete communication cycles to for the LED 2 light to correctly determine what colour this LED light should be.
- once you receive the Congratulations screen, your ConnectedCrops Station is now active and correctly communicating sensor data
- Press the Next button to complete the registration.
3.3.3 Accounts
Selecting Accounts allows a user to perform 3 tasks:
- change their password
- change the name of their farm
- delete their ConnectedCrops account
3.3.3.1 Change Password
Selecting Change Password will redirect the user to a ConnectedCrops Cloud webpage that allows the user to change their password. This page requires the user to remember their old password. If you’ve forgotten your old password, email support@connectedcrops.ca and the team will be able to change your password for you.
3.3.3.2 Change Farm Name
Selecting Change Farm Name allows the user to change the name of their farm.
3.3.3.2 Account Deletion
Selecting Account Deletion allows the user to permanently delete their ConnectedCrops account. This will delete all stations, sensor data, and user account information from the ConnectedCrops server.
3.3.4 Help
Selecting Help displays a series of screenshots that briefly explain how to use the CCMobile App.
By scrolling past the last screen on the Help page, a user can:
- click on the manual link to be taken to the ConnectedCrops web page where they will be able to download this CCMobile App User Manual in PDF format or display the manual in the phones default browser
- click on the FAQ link to be taken to the ConnectedCrops web page where they can browse through common questions or topics
- click on the support@connectedCrops.ca link where they can select an email application on their mobile phone and send an email to the ConnectedCrops support team
3.3.5 About
Selecting About displays the version information for the installed CCMobile App.
3.3.6 Logout
Selecting Logout will display a prompt to confirm that you wish to log out of the CCMobile App. By selecting Yes, the user will be logged out. The next time the CCMobile App is launched, the user will be required to log into the app.
4: Troubleshooting
Depending on what you are trying to do, there are several ways to troubleshoot a Station. In all cases, check the status indicators on the Station. ConnectedCrops Stations are provided with 4 bi-colour LED lights on the front cover for status indication and troubleshooting. They will be either red, blue, or not illuminated.


To troubleshoot, you need to first understand what the indicators are.
4.1 LED Lights Guide
While the Station is in its ‘Wake’ state, the lights illuminate and flash to indicate the status of their respective features. While the Station is in its ‘Sleep’ state the lights are not illuminated to conserve battery power.
Each light indicates the status of a specific feature of the Station: Battery, Cellular connection/communication, Board components, and Sensors. The Station has 2 states:
- Wake: when the Station is communicating sensor data, and
- Sleep: when the station is performing no activities and operating with the lowest battery consumption possible.
On station initialization (e.g., when the fuse is inserted or after the Reset button is pressed), the Station will do a test to validate all of its components. The LEDs will then flash on and off 5 times to represent the success or failure of the initialization process. If all flashes illuminate blue, the initialization was successful. If all flashes illuminate red the initialization process failed. The results of the validation test are shown right before the unit sleeps and this takes anywhere from 30 seconds to 3 ½ minutes to appear.
The following illustrations show the meaning of solid or flashing light sequences for each LED during the ‘Wake’ phase of the Station.
4.1.1: Battery LED


4.1.2: Connection LED


4.1.3: LED1: Internal Hardware


4.1.4: LED2: Internal Hardware


4.2 Troubleshooting Scenarios
4.2.1: Station lights are not illuminating during startup
- is the fuse in good shape? If it’s broken, the station will not receive power and you will need a replacement, contact support
- was the fuse’s cap well sealed, or could it have let moisture in? If moisture got in, it might have caused damage to the station, please contact support
- is the fuse connected properly? There isn’t a specific direction for it, just make sure it’s pushed in until you feel resistance
If the answers to all of the above are “Yes”, then the station may not be charged. Please leave it in the sun for 3-8 hours (or more if cloudy) and check again.
4.2.2: Not getting readings on the CCMobile App
- try to reset the station by either pushing the reset button or removing and reinserting the fuse. This will force the station to restart and attempt to send sensor readings to the ConnectedCrops Cloud server and then be picked up by the CCMobile App;
- if lights are illuminating on startup, check the state and colour of the battery LED. If it is flashing red it means the battery is too low. To conserve battery power, the station will not attempt to send data to the ConnectedCrops Cloud server if the battery is below 8%. The data is collected as scheduled but stored on the station until the battery has charged sufficiently to send the data. Leave the station in the sun for 4-6 hours and check if the readings have arrived
- if the battery LED is blue, check the Cellular Connection LED. If it’s flashing red, the station is struggling to connect to the cellular network. Confirm, using your mobile phone, if you have a strong cellular signal. If you can a mobile call while standing beside the station, the cellular signal should be strong enough for ConnectedCrops. If it used to work in that location but is struggling now, it could be a temporary issue with the network. Wait for a short period of time and check again;
- if the Connection LED is solid red, it means there is an internal issue with the connection or the SIM card, please contact support
- if none of these solutions corrects your problem, please contact support
4.2.3: Sensors are connected but show as though they are not
In the CCMobile App, you may encounter the message “Please connect the sensor” for one (or more) of your sensors. This error is shown if the ConnectedCrops station is not receiving data from a sensor port on the back of the station (Ports 1 – 4) that is configured to have a sensor connected to it. If you think you should not be getting this error, please check the following:
- is the port configured for a sensor (e.g., temperature or soil moisture sensor) and is the sensor connected to that port? If so, is the connector screwed all the way in? Disconnect and re-connect the sensor, making sure you align the pins correctly, and then turn the metal ring around the connector clockwise until you face resistance. Please do not use tools to tighten the connector. The connector can be tightened with your fingers alone. If you feel it offers too much resistance
- remove the connector and make sure the pins are straight.
- make sure the Key guide on the sensor connector (male) is properly aligned with the key slot on the station connector (female) when inserting the connector. It helps to rotate the sensor connector around with a light amount of force applied until you feel the slot and key align and the sensor connector inserts up to the threads
- make sure the threads are properly aligned before connecting the sensor fully. Never apply excessive torque when connecting the sensors as this could mean the threads are not aligned. It helps to rotate the sensor connector counter-clockwise initially until you feel the threads align
- Make sure that the sensor itself doesn’t have any physical damage or breaks that might affect the signal
- when you reset the station, are you getting a red light on LED #2? If yes, there could be an issue with an internal part of the connector, please contact support
4.2.4: Soil Sensor “Please install sensor in soil” reading
If you are seeing the message “Please install sensor in soil” for a soil moisture sensor in the CCMobile App, it means the readings received from the soil moisture sensor are consistent with the sensor not being in soil.
- if the sensor is in the air (i.e., not installed in the ground) this is expected. Installing the sensor in the ground will rectify the situation
- if the sensor is buried in the ground, there could be an air gap around the sensor. This could occur if:
- the sensor was initially installed in loosely packed soil and the air between the prongs is preventing an electrical conductivity reading from occurring
- the sensor has been installed for a while but environmental conditions, water pockets or machinery operating close by have resulted in an air packet forming around the sensor prongs
- in either case, dig around the sensor carefully and re-install it into the sidewall of tightly packed soil properly.
- it could also be that the soil type is not supported by the sensor’s calibration if it was newly installed. In this case, please contact support
4.2.5: Sensor “Error” reading
If you are seeing the message “Error” for a sensor in the CCMobile App (in place of an expected reading), it means the value being returned by the sensor is outside of its normal operating range. It could mean the sensor is damaged. To verify:
- check the sensor and its cable for physical damage or cuts
- if possible, move the sensor to another location to see if the readings appear in the CCMobile App
- disconnect and reconnect the connector to the station
- press the Reset button on the back of the station
If the readings don’t change, please contact support
4.2.6: “Sensor setup mismatch” reading
If you are seeing the message “Sensor setup mismatch” for a sensor in the CCMobile App (in place of an expected reading), it means the sensor is misallocated on the app under Sensors Setup (e.g., a temperature sensor is plugged into a port configured for a soil moisture sensor). To verify this:
- open the CCMobile App on your phone
- go to Settings> Configure Stations> screen
- choose the station > Sensors Setup radio button
- ensure the port is configured for the sensor connected to that port
- save the configuration when leaving the screen
- press the Reset button on the back of the station
If the readings don’t change, please contact support
4.2.7: Station registration error: Station already exists
If you receive a message during the process of registering a new station that the station already exists:
- check to see if the station has already been registered by looking at your stations listed in the CCMobile App on the Home screen. It could be a station that has not communicated in a while. You can see this by looking at the Last Communication date and time for each of your stations on the CCMobile App Home screen.
If you can’t identify the station, please contact support and supply the Serial Number that is printed on the label on the back of the station (it will start with FFFF….)
4.2.8: Signed up but never got a confirmation email
If you are signing up in the CCMobile App for the first time and you did not receive a confirmation email:
- please check your email spam folder
- it is possible you mistyped your email address when registering the first time. Trying going through the Sign Up process again.
If you still don’t receive a confirmation email or you get an error message on CCMobile indicating that the email is already used, please contact support
4.2.9: Can’t log in to the CCMobile App
If you are having trouble logging into the CCMobile App, check the following:
- check that you have a strong cellular or Wi-Fi signal and can connect to the internet. If your signal is weak, try moving to an area with better coverage or switch between Wi-Fi and cellular and try to log in again
- if you’ve forgotten your password, please click on the Forgot your password? link on the CCMobile App login page
- if you can’t remember your username, please contact support
4.2.10: Station shows offline on CCMobile App although Cellular Connection lights are illuminating
If the station indicates it has not communicated for a long period of time in the CCMobile App but the station Cellular Connection LED lights show it is attempting to communicate at the scheduled interval, please refer to the 3.1.2 Connection LED table in section 3.1 LED Lights Guide to help diagnose the issue:
- if the Connection LED light is solid red, there is a physical problem with the cellular modem and you must contact support
- if the Connection LED light is flashing red it could be:
- the cellular signal strength is poor and the station is struggling to establish or maintain a connection. Check the cellular signal strength using your mobile phone while near the station and attempt to connect to the internet
- the cellular network could be having temporary issues. Check the station again in a few hours to see if the issue resolves itself
- there could be an issue with the ConnectedCrops Cloud. If you have another ConnectedCrop Station, see if it is also experiencing issues. If it is, please contact support
- if none of these activities result in the station re-establishing communication, please contact support and explain the issue you are experiencing
4.2.11: Station doesn’t seem to be charging
If a ConnectedCrops station battery is not charging properly, there are a few indicators you will receive in advance to warn you of the situation:
- if the battery level is between 20% and 40% and the Transmission Frequency is more frequent than 60 minutes:
- the user will receive an email suggesting that they change the transmission frequency to less often to reduce battery consumption
- if the battery falls below 20% of full charge and the Transmission Frequency is more frequent than 60 minutes:
- the Transmission Frequency will automatically be changed to every 60 minutes the Battery LED light will flash Red while the station is booting up or performing a scheduled communication
- the user will receive an email or text message alert indicating the battery level is below 20%
- if the battery falls below 15% of full charge:
- the Battery LED light will flash red the Connection LED will flash Blue or be solid Blue while the modem is communicating
- the station will only send the most recent sensor readings. If some older data has been placed in the queue, this data will not be sent. This is done to preserve the battery by limiting how long the modem is powered. This queued data will be sent when the battery level returns above 15%
- if the battery falls to between 3% and 7% of full charge:
- the Battery LED light will flash Red or be solid Red while the station is booting up or performing a scheduled communication
- the station will not power up the modem and no data will be sent to the ConnectedCrops Cloud or the CCMobile App. The station will continue to gather data and place it in the queue to be sent at a later time
- if the battery falls below 3%:
- the station will go into a deep sleep mode. The station will show no activity if the Reset button is pressed and no data will be gathered.
- the user-defined Transmission Frequency will automatically be changed to every 60 minutes. The user will not be able to change this transmission frequency through the CCMobile App until the battery level has reached 8%
To ensure the battery can be properly charged:
- make sure the solar panel is facing south, exposed directly to the sun, not in the shade or under foliage, and the surface of the station is clean (i.e., not covered with dirt)
- decrease the transmission frequency to every 6 hours using CCMobile App to allow the battery to charge faster before returning the frequency to its original setting. If you tried all of the above and it still doesn’t seem to be charging, please contact support.
4.2.12: Not Receiving email or SMS text messages when sensor thresholds are exceeded
When a sensor reading exceeds one of the threshold values, you will receive a push notification on your phone for the CCMobile App but you can also receive email and SMS text messages for this event. If you expect to be receiving email and/or SMS text messages but are not:
- check that the Email: slider is enabled and that your email address is correctly entered (section 3.3.1.5 Receive notifications via…)
- check that the SMS: slider is enabled and that your mobile phone number is correctly entered (section 3.3.1.5 Receive notifications via…)
- check that the expected email and/or SMS text message was not triggered during a defined Blackout Period (section 3.3.1.5 Receive notifications via…)
5: Contact Us
At any time, feel free to contact us at info@connectedcrops.ca or for support, please email us at support@connectedcrops.ca